Girl’s Peter Pan Collar

Peter pan collar frontAfter three years as a freelancer working from home, I can say with confidence that I have no idea what is fashionable. Knowing what’s on trend is for people who see other people every day and/or who buy clothes. I find I don’t do either with much regularity.

So I was a bit surprised when my sister Jenny suggested I make a detachable Peter Pan collar for Stella’s seventh birthday. It turns out these collars have been a thing for a few years now, and Jenny noticed that Stella comments each time she sees one in a catalog or magazine.

I searched for patterns online and finally found some that were sized for children. I really liked the shape of this collar from My Sparkle. It was just what I had in mind except I wanted the tie to be in front rather than the back, and after seeing some other collars, I wanted it to be reversible. The construction method in the pattern wasn’t going to work for the reversible aspect (the pattern called for slitting the collar lining to turn it inside out), so I figured out my own steps.

I cut the pattern from two different fabrics and from a medium-weight fusible interfacing. I fused the interfacing to the front fabric pieces. I then cut my ribbon ties to several inches long and pinned them to the top of the front collar fabric.

Peter pan collar step 1I would be sewing pretty much all the way around the collar shape, and I didn’t want to catch the loose ribbon end in the stitches, so I secured it to the center of the collar with a pin.

I placed the back piece of fabric right sides together over the front and sewed around the edges, leaving a few inches open for turning. Then I trimmed all the seam allowances with pinking shears.

Peter pan collar step 2

I turned the pieces right side out, pressed the edges flat, and top-stitched around the edges, closing the turning hole in the process. Then I realized I’d made a mistake.

Peter pan collar mistake

Gah! I pinned one of the ribbons to the wrong edge of the collar. Since the whole thing was sewn together already, I got lazy, and just picked out the stitches in that corner. By the time I got the stitches out, the fabric in that area was a bit worse for wear, but I moved the ribbon and closed up the seam as best I could. Now the ribbons were in the right place.

Peter pan collar halvesThe pattern called for hand stitching the two collar halves together, but I machine sewed the back edges instead. Here’s the front and the back.

Peter pan collar frontPeter pan collar reverse

I hope Stella likes at least one side of the collar and wears it a few times. I don’t know that it will hold interest to her (or hold up) much longer than that. But that’s fine considering how quick and easy the project was to make. Then I’ll just make her whatever she tells me is in fashion next.

A Few More Christmas Gifts

In the week before Christmas I found myself in the perfect sewing zone. I was feeling creative with time on my hands, but I felt none of the pressure that often comes with sewing gifts. So I took full advantage of that zone and whipped out a few more small items.

Our niece Haley had asked for a jewelry box for Christmas, but I felt a little weird giving her an empty box. So I made a buttoned cuff bracelet using some of her favorite fabric.

Cuff bracelet 2

Cuff bracelet

The bracelet is just a regular quilt sandwich cut into a rectangle the size of a very skinny girl’s wrist. I quilted it with straight lines, including an H for Haley (upside down in the photo above), and added the button and rickrack loop for closing it.

Nephew Jacob was all about the gift cards this year, but I couldn’t gift him just a gift card. So I used some of my leftover shark fabric and made a quick gift card holder.

Shark giftcard holder

I added interfacing between the two layers of fabric and sewed on a snap for closing it.

For Mom, I made up the infinity scarf kit that I had gotten at Sewn Studio last Christmas.

Mom Infinite Scarf

The pre-cut pieces seemed like they would make a scarf too large for my petite mother, so I trimmed both the width and length of the fabrics. The fabrics (a luscious voile and velveteen) and instructions were from Anna Maria Horner. I couldn’t quite wrap my head around the way she finished off the scarf, though, so I followed an infinity scarf tutorial from Skip to My Lou for that part.

The handmade gift recipients all seemed very appreciative. Here’s the Stella girl in her shark skirt.

Stella Skirt

(In both this photo and the one above, you can see Mom’s stripe quilt that’s hanging on the wall in her living room. Two of my sisters are already duking it out for that one. I don’t know whose foot that is over Stella’s shoulder.)

And finally, here’s that same little girl working on her lacing cards.

Stella Sewing

The next generation of family sewers in the making!

Girl’s Shark Skirt

shark skirt 1When last I asked my four-year-old niece, Stella, her favorite colors were pink and blue. Her favorite food was fruit cocktail. And her favorite animal? Sharks. Or as she said it, shawks.

As an aunt, I feel it my duty to only encourage things like the love of sharks and fruit cocktail. Not that she needs much encouragement in the area of sharks. She has shark books that she asks her mom to read to her each night. The shark books need to leave the room in order for her to sleep, of course, but she is only four. And she watched all the Shark Week shows her mom recorded for her. Even the shark autopsy show that her mom would have preferred to fast-forward through.

So when I happened upon this Alexander Henry shark fabric at The City Quilter in New York, I couldn’t help but think of my sweet Stella.

shark skirt detail 2

I have to admit, the fabric is a bit graphic. I’m not sure she’ll be able to wear it to school. And the rendering is also not entirely accurate, according to my in-home shark expert. So the skirt should not be considered a learning tool.

shark skirt 2

But as a fun, full play skirt, I think it works just fine. I followed the Twirly Skirt tutorial from the House on Hill Road blog. The tutorial was very easy to follow. And I really liked that the pattern called for an opening in the side in which to slide the elastic (and the tie).

shark skirt detail

Since I don’t know Stella’s exact waist size, I guessed based on this handy chart for children’s clothes sizes I found from Butterick. But if it turns out I guessed wrong come Christmas time, it’ll be super easy to get at the elastic to make it smaller or to insert a new piece if it needs to be bigger.

I was going to pair the shark fabric with some Liberty of London fabric I picked up at the same time, but I decided it was a little too light. I found this Riley Blake fabric in my stash, and I think it works well. And it kind of looks like clams, which Stella told me is a major component of a shark’s diet. (All of you shark experts are shaking your heads, I know.)

I did want to get one more thing for the girlie, so last night I picked up some fairy lacing cards for her, too. So fairy lacing cards and a shark skirt—merry Christmas, sweet Stella!

Project Apron for Haiti

I first heard of Project Apron for the women of Haiti on Maureen Cracknell’s blog (a lovely place to visit filled with tutorials and inspiration), and as she explained there, new handmade aprons are being collected to send to women in Haiti who often have nothing pretty and new just for themselves.

The project is being organized by Craft Hope, a group formed by Jade Laswell to share handmade crafts with those less fortunate. A new project is posted each month or so on the group’s Facebook page, for now, until their new web site launches.

The aprons that are made are being sent to another organization, Haiti by Hand, formed by Rebecca Sower. I had the pleasure of meeting Rebecca at the 2010 The Creative Connection Event, and I very much admired her dedication to helping the people of Haiti. Rebecca and her family make regular trips to Haiti, bringing with them donated craft supplies that they share with the women there. These women then make beautiful jewelry and other craft items to sell. In addition to the craft supplies, Rebecca has collected donated quilts, glasses, shoes and other necessities that are still very much needed.

With all these women working to make Project Apron happen, I couldn’t possibly turn down the opportunity to participate. So make a bright, cheery apron is what I did.

I looked through my sewing project books for an apron pattern I liked, and then turned to the internet, where I found a free e-book from FaveCrafts featuring eight apron projects. No one apron had everything I was looking for, so I pieced together instructions from several patterns to make my apron.

To make the apron the same way that I did, gather fabric for your apron front, lining, ties and pockets and include a bit of ribbon embellishment if you like. Cut the front and lining pieces to 32 inches wide by 22 inches long. I started making the apron with just a front piece, but I decided to add the lining to make it feel a little more special.

Before sewing the lining to the front, make and attach the pockets to the front, so the pocket stitching lines won’t show on the lining side. Cut 4 pockets pieces to 5.5 inches x 6 inches, then make two piles each with two pieces right sides together. Fold the first pile in half and use a round item and marking tool to draw a curve on the open corner (I used a spool of ribbon and my beloved Chaco Liner). With the pile still folded in half, cut the corner piece off and open to reveal the pocket pieces with two rounded bottom corners.  Repeat for the second pile of two pocket pieces.

Sew around the edge of each pocket with a 1/4-inch seam allowance, leaving a couple inches open at the top of each pocket. Clip the seam allowance in the top corners and notch the seam allowance around the curved bottom. Turn each pocket right side out and press.

Cut your ribbon embellishment a bit longer than the width of each pocket. Pin the ribbon in place and hand stitch to secure. Wrap the ribbon ends to the back of the pocket and tack down with several stitches to secure. Top stitch the top edge of the pocket to close the turn opening.

Find the center of the apron front by folding in half with short ends together. Mark the center with a straight vertical line about 8 inches long. Measure 6.5 inches down from the top edge, and draw a horizontal line about 12 inches long that intersects the center line. From the center line, measure along the horizontal line 5 inches to the left and mark this spot. The upper right corner of the left pocket will be placed here. Mark 5 inches to the right of the center line and mark this spot. The upper left corner of the right-hand pocket will be placed here. Pin the pockets in place.

Sew along the sides and bottom of each pocket to secure to the apron front.

Pin the apron front and lining pieces right sides together. Sew along the sides and bottom only. Clip the two bottom corners and turn right side out. Press. Set the apron aside while you make the waistband/ties.

Cut your waistband fabric 5 inches wide by as long as you prefer. I cut mine to 96 inches long because I like to wrap the ties around to the front of my aprons. Fold the waistband in half with right sides together, so it’s only 2.5 inches wide. Sew along the long edge to form a long tube. Turn the tube right side out and press flat so the seam runs down the center. Fold the ends of the tube in about 1/4 inch, so the ends have a finished looked, and press.

To add some gathers to the apron, thread a needle with a contrasting color thread, making sure the thread is at least as long as the top edge of the apron. Tie a knot in the thread. Hand-stitch a running stitch very near the top edge of the apron. Make gentle gathers in the apron and once you’re pleased with the gathers, knot both ends of the thread. After I made the gathers, the top edge of my apron was about 25 inches long.
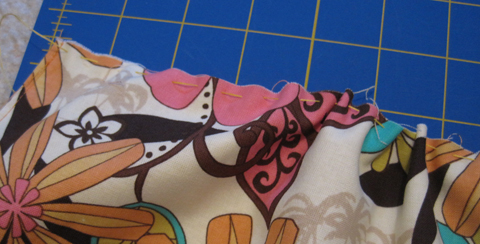
Find the center of your long waistband piece and line it up with the center of the apron front. Pin the waistband, seam side up, to the top edge of the apron.
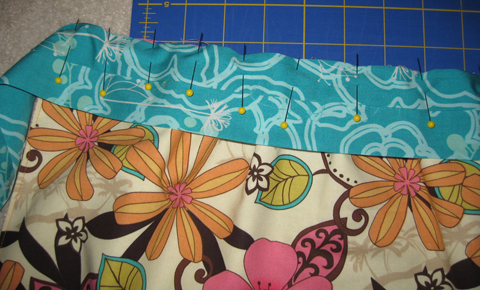
Sew the waistband to the top of the apron with a 1/4-inch seam allowance. Fold the waistband upward and press at the seam. Fold the waistband down and around to the lining side of the apron. Pin the waistband to the lining side, making sure the waistband covers the stitches you just sewed.

With the front of the apron facing up, top stitch along the bottom edge of the waistband about 1/8-inch from the first seam. Because the waistband extends past this seam in the back, the waistband is being attached at the same time you sew the top stitch to the front. Begin and end this stitch at the side edges of the apron.

To finish the ties, fold the front edge under about 1/4 inch and then pin the ties in half. (The seam allowance when you first sewed the waistband to the apron is 1/4 inch, so I folded the edge of the tie in this same amount so the waistband and the ties were the same width. If you prefer not to make the waistband and ties this way, check out other apron patterns for ideas, including making the waistband and ties separate pieces.) Sew around the bottom and end of each tie with 1/8-inch seam allowance.

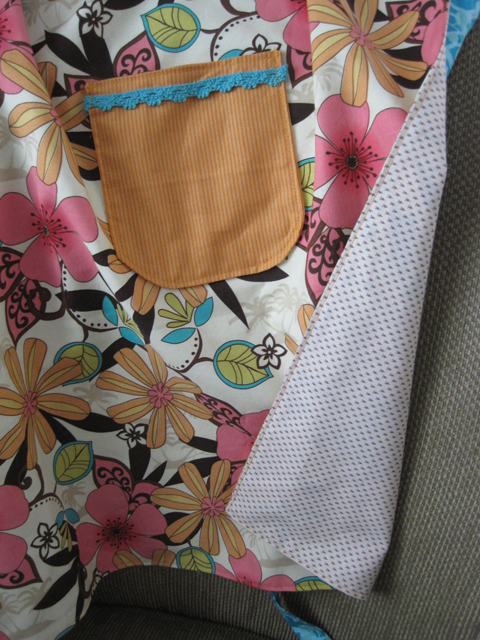
I’m a size 8 and the apron wraps around my sides but is still open in the back.

You could enlarge or reduce the size of the front panel and lining pieces in both length and width to make an apron that’s either larger or smaller than this.

The Project Apron through Craft Hope ends on May 31. But Rebecca Sower and Haiti by Hand will continue to collect the aprons through July. So I’m hoping to make at least one more apron to send, playing with the pattern some more to see what variations I can come up with!

If you’re interested in make an apron for Project Apron, please check out the Craft Hope or Haiti by Hand sites for all the details. Then send your aprons to:

HAITI BY HAND

3333 BENTON ROAD

CEDAR HILL TN  37032

Summer Purse, Part 2

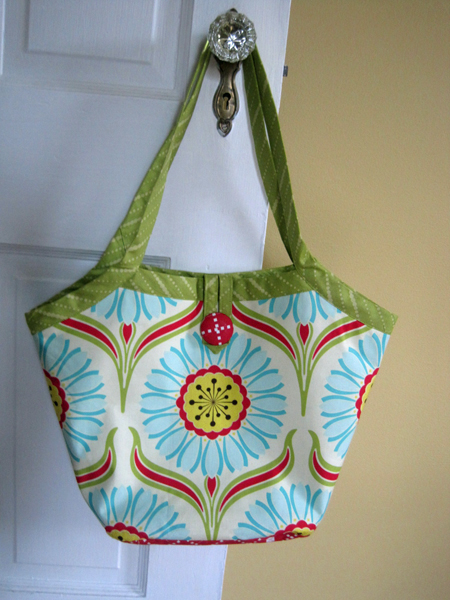
As I mentioned in my last post, a summer bag was the third and final craft project I wanted to complete before our upcoming vacation. And here it is!

The bag pattern is from The Bag Making Bible by Lisa Lam. I chose The Reversible Bucket Tote and added some interior pockets using tutorials from the book.

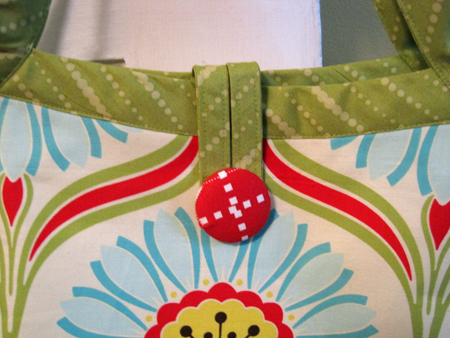
The loop for the closure is cut on the bias and sewn on before I put the binding on the bag. The button is from a kit by Dritz that I covered with the red accent fabric (from Moda). These buttons couldn’t be easier to make. The pieces truly just pop together once you have your fabric in place.

After I completed the bag, I got to worrying about the handles. The bag body is really a fairly good size. And when I have a lot of room in a bag, I tend to fill it. Because the handles, as made following the pattern, are just bias binding, I feared they wouldn’t be up to the task. So I ended up unsewing the seam in both handles and inserting two pieces of 1-inch wide fusible interfacing into each.

I was trying to avoid unsewing the entire handle, so I shoved the interfacing as far as I could into the part of the strap that was sewn to the bag. If you’re thinking about making this bag, consider interfacing at least the handle parts of the two 34 x 4-inch strips. If you put the interfacing on the entire length of the strips, you’ll lose the bias stretch that allows the strips to hug nicely to the curve of the bag edge. Personally, if I were to make the bag again, I’d probably interface the full length of the handle strips, sacrificing the stretch for strength.

Finally, I am going to Scotchgard the exterior fabric with Fabric and Upholstery Protector, because it is so light in color. I haven’t used that product on any of my projects before. Fingers crossed. And I’ll let you know how the whole bag holds up next week!

In case you’re interested, the exterior fabric is a Heather Bailey for FreeSpirit; the red is Moda; the teal interior is Cosmo Cricket; the green has been lost to time (but let me know if you know).

Summer Purse, Part 1

I had three craft goals I wanted to accomplish before our vacation next week. 1. Sew a skirt: check. 2. Learn to crochet granny squares: check. 3. Sew a summer purse.

For the purse I chose a basic pattern from The Bag Making Bible by Lisa Lam. I’ve used this book before to make zippered pouches, and I like that while there are 8 bag patterns, there are also a ton of techniques for adding the elements that will make bags useful to you.

So, while the bag I selected (The Reversible Bucket Bag from Chapter 2) didn’t have any interior pockets (because it was meant to be reversible), I chose to add some based on instructions from elsewhere in the book.

The easiest pocket to add was the Lined Slip Pocket. It’s simply two pieces of fabric sewn right sides together, turned right sides out, and stitched onto the lining fabric of the purse.

I created an extra long pocket and divided it into sections for a pen, a phone and keys. (The time to add pockets is before the purse is assembled, so the pieces in these photos are just my lining pieces.)

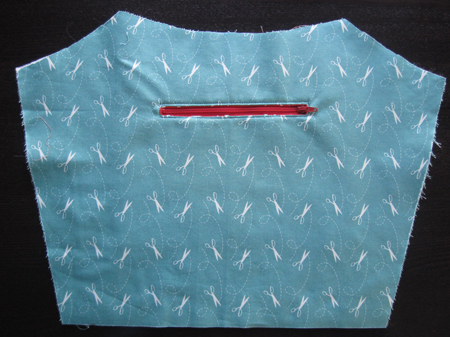
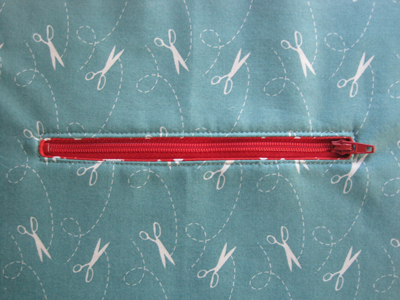
The super exciting pocket to make was the Flush Zip Pocket. It’s a pocket, just like you see in store-bought bags, that securely holds smaller items in a pocket behind the bag lining.

This particular pocket was one that I saw Lisa demonstrate while we were filming her Bag Closure Techniques video, and I have to admit that seeing someone make this pocket helped immensely. The instruction in the book is thorough, but for a visual learner like me, seeing it helped the written instruction to click.

The trickiest part of making this pocket was holding the zipper in place to be sewn. The instructions call for double-sided basting tape, which I didn’t have. Pins completely distorted the zipper. So I used plain old Scotch tape to hold the very edges of the zipper in place. I was prepared to muck up my needle by sewing through the tape, but the tape was far enough out that I didn’t even hit it.

Next up: Sewing it all together. More next week!

I Made a Skirt!

I did it! I made a skirt! I haven’t made one before, but I challenged myself to do just that for our upcoming beach vacation. What better place to wear a light and cheery cotton skirt?

After pouring through my sewing books, I decided to make the Breezy Beach Wrap (perfect) skirt from Sew What! Skirts by Francesca Denhartog and Carole Ann Camp. The book contains instructions for 16 skirts, all made by creating your own pattern using your measurements.

Once I had decided on the skirt to make, I needed to get the fabric. On the way home from the Columbus area one weekend, my husband and I stopped by The Fabric Shack in Waynesville, Ohio, a truly wonderful fabric store with an extensive selection of cottons for sewing and quilting. (There is a separate store a block up the street that carries decorator and specialty fabrics, too.) We passed through the whole store twice and decided this fabric was the best choice. It just looked like something I’d wear.

It wasn’t until a few weeks later, when I started in on the skirt, that I realized it’s a Lotta Jansdotter print. Lotta Jansdotter! You mean the same designer whose plates, bowls and mugs we loved so much we had to have them on our wedding registry last year? Yep.

Sew What! Skirts includes a formula to draft the skirts that uses your waist measurement, hip measurement and the distance between the two. After measuring twice, just to be sure, and plugging those numbers into the formula, I drafted the pattern right onto the fabric. It was a bit scary, but much easier than I had imagined because the instructions were so clear.

The skirt instructions included an option to add a buttonhole to slip one of the ties through to get a smoother profile. Since my profile can use all the smoothing it can get, I did add the buttonhole to the waistband, following the instructions that came with my machine. It was my first buttonhole, too, and again, it really couldn’t have been any easier.

The skirt wraps in the back, rather than at one side, so it’ll be a little hard to know if it has flown open. But there’s a good amount of overlap, so hopefully not too much shows if it does.

One of my biggest concerns about making a skirt was getting the hem right. I’m not really known for my even and straight double-folds.  So I decided to invest in an aluminum hem guide (about $16). It has guides for both curved and straight hems, and I ended up using both to give the right flow to the hem. I can see myself using this for all sorts of projects, though, including quilt labels. A very handy notion to have.

My only modification to the project was the addition of a second fabric for the waistband. For some reason, I just couldn’t image the skirt with all the same fabric. I guess that’s the beauty of making your own!

Zippered Pouches to the Rescue

When my job of 15 years came to an end in November 2011, I knew I wanted to take time off from work. I also knew I was going to have to keep busy in some other way as I adjusted to my new life without an office to go to five days a week. And that’s where the zippered pouch comes in.

I had made a couple of zippered pouches earlier in the year, after working on a craft video with Lisa Lam, author of The Bag Making Bible. In that video Lisa demonstrated just how not scary zippers could be, and the sewn zippered pouch seemed like the perfect place to test that notion. So I made a few for myself, pretty much got the hang of them, and then got busy again with work.

Once November came around, zippered pouches filled a void perfectly. They kept me busy when I needed to do something tangible; they were still a bit of a challenge; and they were useful. So I began sewing of zippered pouches. Nine to be exact by the time Christmas rolled around. My favorite part was playing with the fabrics and zipper colors.

I gave many of those pouches away as Christmas presents (adding a bit of duct tape to the designs for the males in the family). And then I started getting requests from the poor souls who didn’t get zippered pouches. So I made more. And since I’m now to the point where I can make one in about 45 minutes, I whipped one up for the Modern Quilt Guild swap this month, too.

Applique—pretty fancy, isn’t it?

Three months into my new life, I’ve started my own freelance business, editing, proofreading, indexing for publishers and authors looking for an experienced editor. I’m relegating sewing to the weekends again (and the occasional slow afternoon). I know I have a few more zippered pouches in me (they are so darn useful), but I’m hoping I don’t need to make zippered pouches again. If I do, though, I just may have to open that Etsy shop I’ve been thinking about.