I first heard of Project Apron for the women of Haiti on Maureen Cracknell’s blog (a lovely place to visit filled with tutorials and inspiration), and as she explained there, new handmade aprons are being collected to send to women in Haiti who often have nothing pretty and new just for themselves.
The project is being organized by Craft Hope, a group formed by Jade Laswell to share handmade crafts with those less fortunate. A new project is posted each month or so on the group’s Facebook page, for now, until their new web site launches.
The aprons that are made are being sent to another organization, Haiti by Hand, formed by Rebecca Sower. I had the pleasure of meeting Rebecca at the 2010 The Creative Connection Event, and I very much admired her dedication to helping the people of Haiti. Rebecca and her family make regular trips to Haiti, bringing with them donated craft supplies that they share with the women there. These women then make beautiful jewelry and other craft items to sell. In addition to the craft supplies, Rebecca has collected donated quilts, glasses, shoes and other necessities that are still very much needed.
With all these women working to make Project Apron happen, I couldn’t possibly turn down the opportunity to participate. So make a bright, cheery apron is what I did.
I looked through my sewing project books for an apron pattern I liked, and then turned to the internet, where I found a free e-book from FaveCrafts featuring eight apron projects. No one apron had everything I was looking for, so I pieced together instructions from several patterns to make my apron.
To make the apron the same way that I did, gather fabric for your apron front, lining, ties and pockets and include a bit of ribbon embellishment if you like. Cut the front and lining pieces to 32 inches wide by 22 inches long. I started making the apron with just a front piece, but I decided to add the lining to make it feel a little more special.

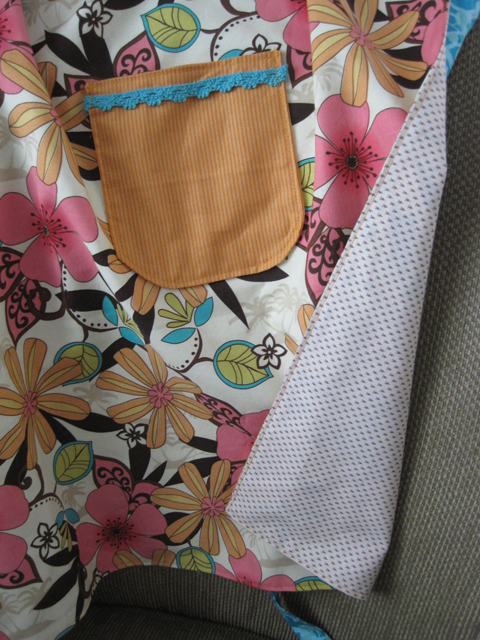
Before sewing the lining to the front, make and attach the pockets to the front, so the pocket stitching lines won’t show on the lining side. Cut 4 pockets pieces to 5.5 inches x 6 inches, then make two piles each with two pieces right sides together. Fold the first pile in half and use a round item and marking tool to draw a curve on the open corner (I used a spool of ribbon and my beloved Chaco Liner). With the pile still folded in half, cut the corner piece off and open to reveal the pocket pieces with two rounded bottom corners. Repeat for the second pile of two pocket pieces.

Sew around the edge of each pocket with a 1/4-inch seam allowance, leaving a couple inches open at the top of each pocket. Clip the seam allowance in the top corners and notch the seam allowance around the curved bottom. Turn each pocket right side out and press.

Cut your ribbon embellishment a bit longer than the width of each pocket. Pin the ribbon in place and hand stitch to secure. Wrap the ribbon ends to the back of the pocket and tack down with several stitches to secure. Top stitch the top edge of the pocket to close the turn opening.

Find the center of the apron front by folding in half with short ends together. Mark the center with a straight vertical line about 8 inches long. Measure 6.5 inches down from the top edge, and draw a horizontal line about 12 inches long that intersects the center line. From the center line, measure along the horizontal line 5 inches to the left and mark this spot. The upper right corner of the left pocket will be placed here. Mark 5 inches to the right of the center line and mark this spot. The upper left corner of the right-hand pocket will be placed here. Pin the pockets in place.

Sew along the sides and bottom of each pocket to secure to the apron front.
Pin the apron front and lining pieces right sides together. Sew along the sides and bottom only. Clip the two bottom corners and turn right side out. Press. Set the apron aside while you make the waistband/ties.
Cut your waistband fabric 5 inches wide by as long as you prefer. I cut mine to 96 inches long because I like to wrap the ties around to the front of my aprons. Fold the waistband in half with right sides together, so it’s only 2.5 inches wide. Sew along the long edge to form a long tube. Turn the tube right side out and press flat so the seam runs down the center. Fold the ends of the tube in about 1/4 inch, so the ends have a finished looked, and press.
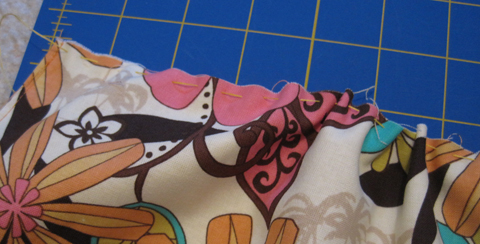
To add some gathers to the apron, thread a needle with a contrasting color thread, making sure the thread is at least as long as the top edge of the apron. Tie a knot in the thread. Hand-stitch a running stitch very near the top edge of the apron. Make gentle gathers in the apron and once you’re pleased with the gathers, knot both ends of the thread. After I made the gathers, the top edge of my apron was about 25 inches long.

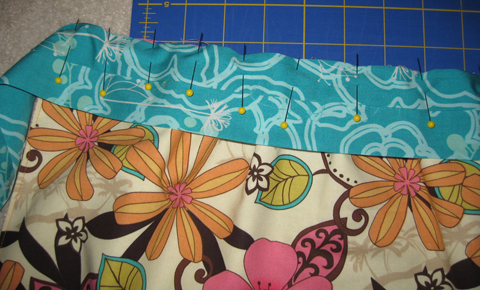
Find the center of your long waistband piece and line it up with the center of the apron front. Pin the waistband, seam side up, to the top edge of the apron.

Sew the waistband to the top of the apron with a 1/4-inch seam allowance. Fold the waistband upward and press at the seam. Fold the waistband down and around to the lining side of the apron. Pin the waistband to the lining side, making sure the waistband covers the stitches you just sewed.
With the front of the apron facing up, top stitch along the bottom edge of the waistband about 1/8-inch from the first seam. Because the waistband extends past this seam in the back, the waistband is being attached at the same time you sew the top stitch to the front. Begin and end this stitch at the side edges of the apron.

To finish the ties, fold the front edge under about 1/4 inch and then pin the ties in half. (The seam allowance when you first sewed the waistband to the apron is 1/4 inch, so I folded the edge of the tie in this same amount so the waistband and the ties were the same width. If you prefer not to make the waistband and ties this way, check out other apron patterns for ideas, including making the waistband and ties separate pieces.) Sew around the bottom and end of each tie with 1/8-inch seam allowance.


I’m a size 8 and the apron wraps around my sides but is still open in the back.
 You could enlarge or reduce the size of the front panel and lining pieces in both length and width to make an apron that’s either larger or smaller than this.

The Project Apron through Craft Hope ends on May 31. But Rebecca Sower and Haiti by Hand will continue to collect the aprons through July. So I’m hoping to make at least one more apron to send, playing with the pattern some more to see what variations I can come up with!
If you’re interested in make an apron for Project Apron, please check out the Craft Hope or Haiti by Hand sites for all the details. Then send your aprons to:
HAITI BY HAND
3333 BENTON ROAD
CEDAR HILL TN 37032


