
Back in January of this year, the members of the Cincinnati Modern Quilt Guild were issued a challenge to create any sewn item using improvisational piecing techniques. We had two education segments prior to the challenge to get us in the improv mood, and then we had four months to complete our pieces, which needed to include a color we were arbitrarily assigned. We were also instructed to keep our projects on the down-low so we could anonymously vote for our favorites.
The May meeting was the big reveal for our challenge pieces. Each piece was assigned a number, and from the roughly 25 entries, we voted for the best use of improv, best use of our assigned color, and viewer’s choice.
After the winners were announced (I didn’t win anything), everyone identified which piece was theirs and talked a bit about their process. As we came to each piece that was spread out on the tables, the maker of that piece came forward. Finally, my piece was up, and I was about to step forward . . . but then someone had to leave, so we jumped ahead to her piece. Then it was my turn . . . but something else happened, and we were delayed again.
Finally, it was my turn. As I walked to the table, I said, “Sometimes I like to make projects that make me laugh. This is my piece, Creepy Dolls with Improv Border.”

And it was like everyone in the room breathed a sigh of relief, kind of as if they weren’t sure if I knew how weird my entry was. And then they laughed.
It all started when I was assigned my color: Grellow (the assigned colors were all Kona solid colors for easy identification). It wasn’t required, but I ordered a half yard of Grellow just to have a feel for the actual color. I had it sitting around my craft room for a few weeks, to give it a chance to inspire me, when I got to thinking about some fabric I received from a friend.
My friend’s aunt has passed away, and my friend let me pick some pieces from her aunt’s fabric stash. One of the pieces I took was a weird border print with dolls.

Grellow was very similar to the background color of the calico print in the creepy dolls fabric! With that realization, I became very excited about this challenge.
I decided to start with a panel with two of the dolls.

From there, I selected solid colors from my stash, including Grellow, to use in the border. At first, I just had Grellow, orange, green, and red, but that was crazy bright. When I asked Greg’s thoughts, he suggested I add a dark purple. What would I do without him?
With my palette, I started randomly cutting and piecing sections for the border. My first sections were just strips cut with scissors. Note that I threw in some of the background calico as well.


After a while I decided to jazz things up a bit with some triangles. These, too, were cut with scissors and just pieced together to fit.


I trimmed my sections to 4 inches wide and pieced them together to fit around the sides of the panel. If a section wasn’t long enough to fit the panel, I’d just piece together a few more bits of fabric and sew them on to the strip. To be extra improvy, I sewed the top border on first, then the left side, the bottom, and finally the right side.

With the top done, it was on to quilting. I didn’t think any color would look good for the quilting thread, so I used invisible thread for the first time. The brand I purchased was pretty much like fishing line. Apparently, other brands aren’t that stiff, but the stuff I had made the quilting a bit of a challenge. I used yellow thread in the bobbin.
The quilting is just wavy lines from the top to the bottom. But, in an attempt to enhance the creepiness of the dolls, I quilted around their faces and hands and didn’t sew through those parts with the wavy lines.
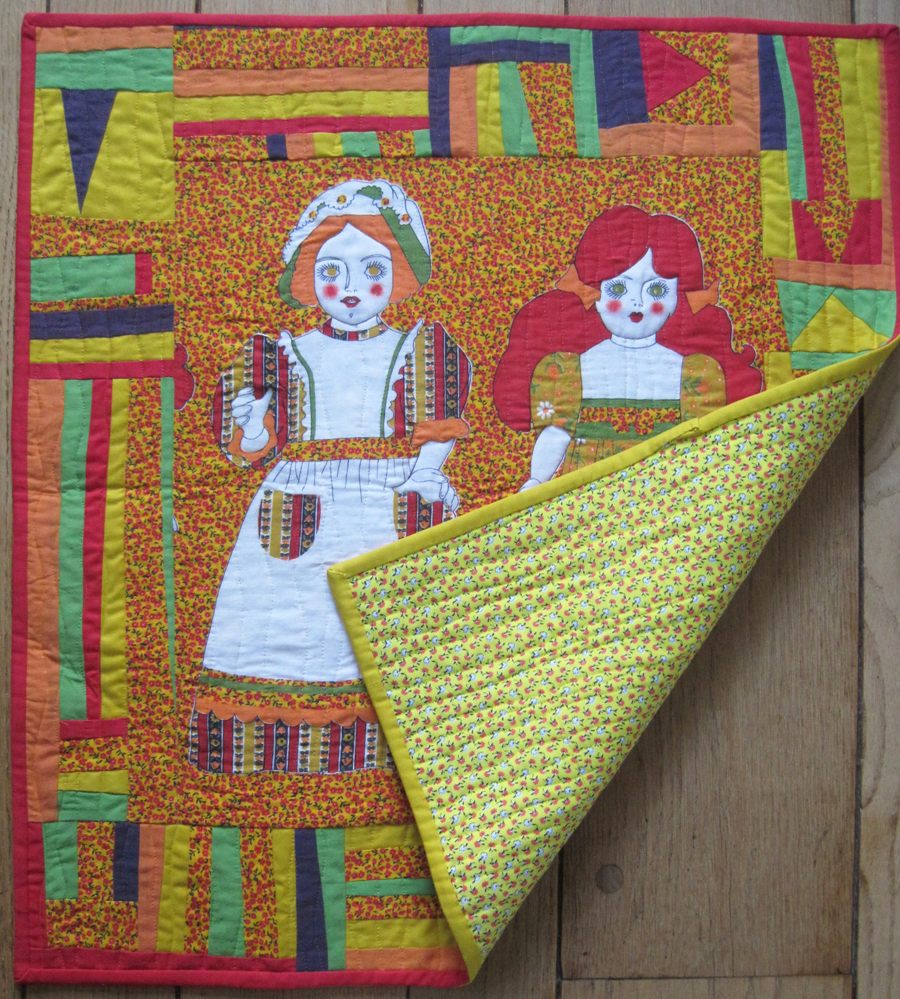
For the backing, I used another piece from my friend’s aunt. I didn’t have enough of any one fabric for the binding, so I made a two-fabric binding following the instructions in the book String Quilt Revival. The finished piece is 24 x 26 inches.
I honestly thought I had a chance at one of the prizes in the improv challenge until I saw some of the other entries. They were amazing (you can see them here). But I am still really proud of this piece and its crazy colors. I like the way the background calico in the border blends with the doll panel. The whole piece makes me smile.


